With the availability of IBM Rational Developer for i (RDi) version 9.8.0.1 most issues with the version 9.8 have been resolved, and many developers want to use the new version.
So after using version 9.8 and 9.8.0.1 since the BETA releases, I have compiled my favorite information, tips and tricks for it. This compilation is a very personal and loose collection – without claiming any completeness or that it will work „on your computer“. As always, your mileage might vary.
Table of contents
- RDi 9.8 installation process
- Applying the permanent activation kit license
- Using a RDi 9.6 workspace with RDi 9.8
- Installing RDi 9.8 updates
- Installing iSphere and other plugins
- Solving remote system password problems
- Bringing back Snippets
- Using RDi in an other language
- Conclusion
RDi 9.8 has a completely new installation process
Yes – RDI 9.8 doesn’t use the IBM Installation Manager (IM) anymore. RDi 9.8 is using the typical Eclipse installation process called „P2“.
Simply spoken, on Windows you only have to decompress the ZIP file „IBM Rational Developer for i.zip“ to any location where you have write permissions and start RDi by double-clicking „RDi.exe“. On macOS you simply copy the „IBM Rational Developer for i.app“ bundle to a location of your choice and double-click the application. That’s it.
The nice thing – you can keep your RDI 9.6 installation in parallel and you can even have multiple copies of RDi 9.8 if necessary.
Applying the permanent activation kit license
Not only the installation itself and the updates process are new – applying the license also works different than in 9.6. But I can only document the process using an activation kit, because I don’t have a license server available.
After lauching RDi 9.8 simply select the trial license – don’t use the „Manage Licenses“ dialog. Instead select „Install new software…“ from the „Help“ menu. Click on the „Add…“ button – give it a more or less meaningful name and select „Archive…“.

Here you should select the file „RDi_9.8_RPGCOBOLTools_AU_Lic_Act_Kit_P2.zip“ which is included in the file „RDi_Act_Kit_9.8_MP_ML.zip“ (which you have to unpack).

Select the permanent activation kit and install it. RDi has to restart to apply the license.
You only have to apply the 9.8 license once – any new installation of RDi 9.8 uses the same license on that machine.
Using a RDi 9.6 workspace with RDi 9.8
I have used a RDi 9.6 workspace – used it in RDi 9.8 – used it again in RDi 9.6 – back and forth – and I never had any problem with that. Of course you cannot use the same workspace in RDi 9.8 and 9.6 at the same time.
So I never had any problems – but your mileage may vary – so there is no guarantee that at one point your workspace will get corrupted and will be unusable. So better make backups of your workspace regularly.
Installing RDi 9.8 updates (like 9.8.0.1)
After the installation there should already be a preconfigured update site for RDi 9.8 updates – just select „Install new software…“ in the „Help“ menu. Then select the preconfigured RDi update site:

If there are any updates available – you can check the updates you want, click the „Next >“ button and follow the instructions..
If there is no preconfigured update site for RDi (whether it was deleted or anything) you can click on the „Add…“ or „Manage…“ button and create an update site. Give it a meaningful name, and enter the following URL in the „Location“ field:
- IBM Rational Developer for i update site
https://public.dhe.ibm.com/ibmdl/export/pub/software/awdtools/rdi/v98/ - IBM Fix List for RDi
https://www.ibm.com/support/pages/fix-list-rational-developer-i
When this update site is selected, the RDi 9.8 updates should be presented. Check the updates you want, click the „Next >“ button and follow the instructions.
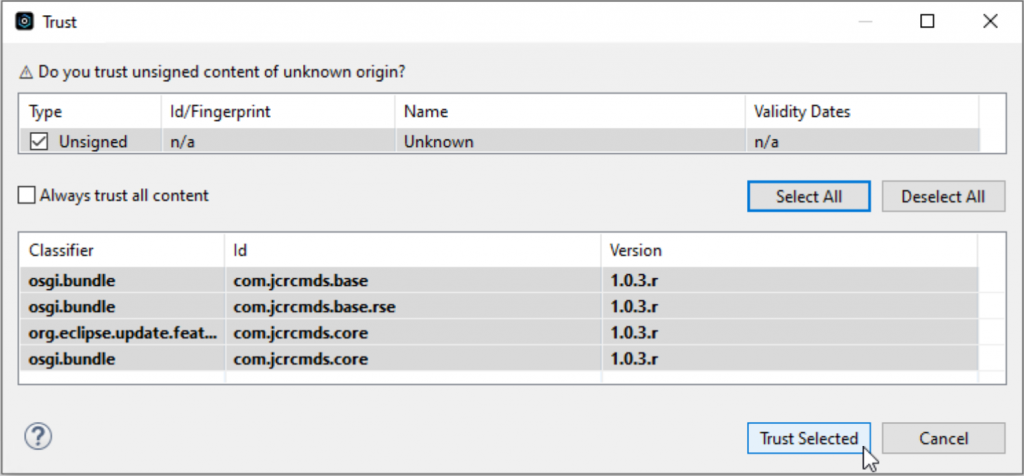
Sometimes updates, features or plugins are not code signed – then just click „Select All“ and „Trust Selected“:

But always look through the list of classes and versions to be sure, that you don’t install any potentially harmful software.
Alternatively you can also download the fixpack from Fix Central and add the downloaded ZIP file to your update sources.
Select „Install new software…“ from the „Help“ menu. Click on the „Add…“ button – give it a more or less meaningful name and select „Archive…“. Select the downloaded ZIP file and add the repository. After this, the process is the same.
Today (2024-01-09) version 9.8.0.1 is officially available.
- You can download the 9.8.0.1 fix pack here
https://www.ibm.com/support/fixcentral/swg/quickorder?parent=ibm%7ERational&product=ibm/Rational/Rational+Developer+for+i&release=9.8.0.1&platform=All&function=fixId&fixids=9.8.0.1-Rational-RDI-fp&includeRequisites=1&includeSupersedes=0&downloadMethod=http&source=fc
Installing iSphere and other plugins
To install the following popular plugins simply follow the instructions how to an update site is configured in the previous paragraph.
- iSphere – the RDi users „Swiss-army-knife“ plugin
http://master.dl.sourceforge.net/project/isphere/eclipse/rdi8.0/ - iRpgUnit – unit testing for RPG
http://master.dl.sourceforge.net/project/irpgunit/eclipse/rdi8.0/ - Craig Rutledges open source IBM i tools
http://master.dl.sourceforge.net/project/jcrcmds/eclipse/rdi8.0/ - Rapid-Fire – fast large database migration tool
http://master.dl.sourceforge.net/project/rapid-fire/clipse/rdi8.0/
In general when installing plugins from Sourceforge use „http://master.dl.sourceforge.net/…“ as the server part – „www.sourceforge.net“ will not work.
Solving remote system password problems
If you have problems connecting to your systems, this might be related to different encryption algorithms from RDi version 9.6 and version 9.8.
The best way solve this problem is to disconnect from all systems, and clear the passwords.
After that, don’t re-connect to the systems immediately.
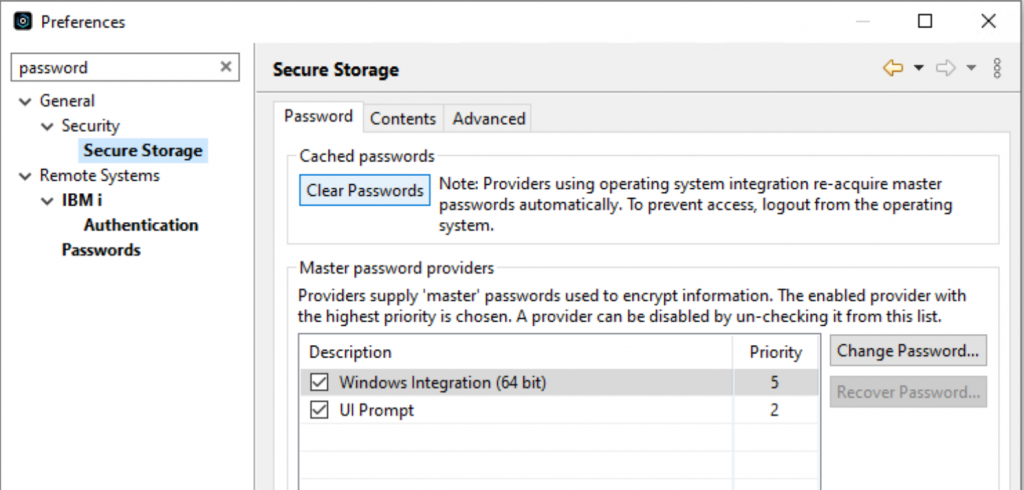
Instead select „Preferences“ in the „Window“ menu, and search for „password“ – then select „Secure Storage“.


Here click „Clear Passwords“ again – and click „Change Password…“ while „Windows Integration (…)“ is selected. You can provide a password hint, but you don’t have to.
Apply and close the settings and connect to your systems. You have to enter your passwords again, and check „Save password“. Now it should work again.
Bringing back Snippets
Snippets is a feature, that some users relied on for their development. But RDi 9.8 doesn’t install Snippets and also the feature to distribute Snippets from a system was removed.
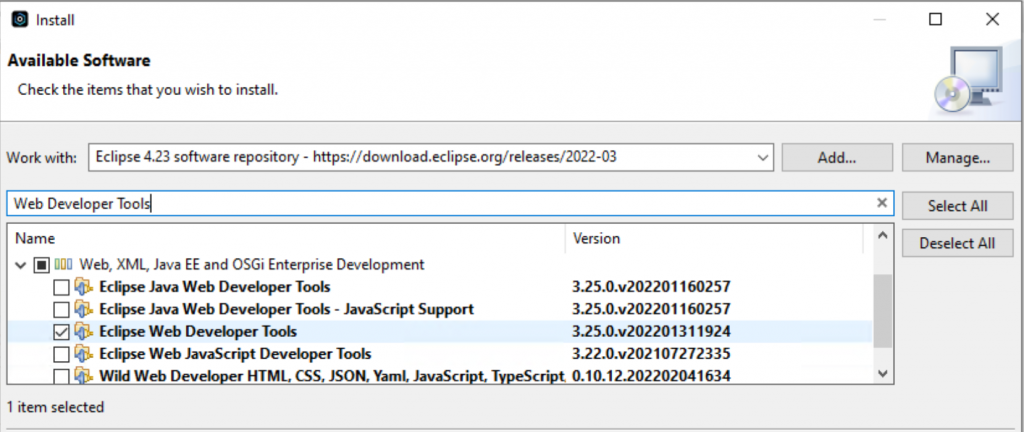
At least, it is able, to bring back Snippets by installing the Eclipse Web Developer Tools package. But – RDi is lagging behind the Eclipse IDE development, so you can’t simply install the Web Developer Tools from the Eclipse Marketplace.
So here what you have to do – once again select „Install new software…“ in the „Help“ menu and create a new update site by clicking the „Add…“ button. Give the new site a meaningful name and enter the following URL in the „Location“ field:
- Eclipse 4.23 software repository
https://download.eclipse.org/releases/2022-03

Use the search box to search for „Web Developer Tools“ and set a check mark in front of „Eclipse Web Developer Tools“. Follow the installation after clicking the „Next >“ button.
If you had the „Snippets“ view open, it should work after RDi has restarted. If you closed the non-working view, you can now open it by selecting „Show View“ from the „Window“ menu. Search for „Snippets“ and open the view again.
Using RDi in an other language
You can use RDi in an other language than the language of your installed OS. As an example I use Windows in German but I want to use RDi in English.
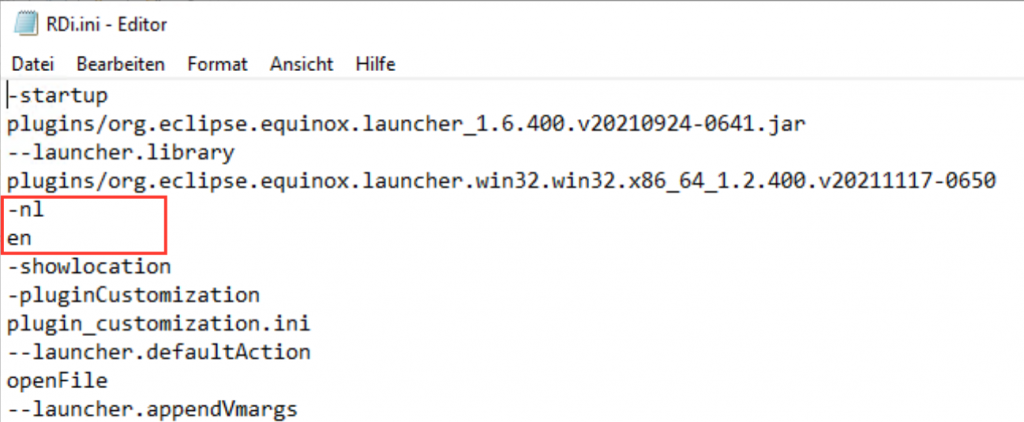
Simply open the file „RDi.ini“ in the installation directory of RDi, and add a line with „-nl“ and another line with the language you want to use – here I selected „en“ for English:

Save the file and start RDi – and the UI will be in the selected language, as far as this language is available. If some elements are not translated, they will show up in English – which make a funny mix.
Conclusion
RDi 9.8 is a major update and brings a completely new installation and update process – but this new process is much better in line with traditional Eclipse processes.
One problem still persists – the Eclipse version on which RDi is based lags several versions (or releases) behind the original Eclipse IDE. But at least, RDi has catched up a little, so it gets easier to use other Eclipse features.
Many Thanks to the team at Fortra for putting so much effeort into the RDi development – and very special thanks to Steve Ferrell for his support during the beta period.
